


Internal Control System এর অত্যন্ত গুরুত্বপূর্ণ একটি অংশ হচ্ছে Bank Reconciliation. QuickBooks Software এ Bank Reconciliation করার সুবিধা রয়েছে এবং এই Software এ করা Bank Reconciliation রিপোর্ট সারাবিশ্বে Auditor দের নিকট অত্যন্ত গ্রহণযোগ্য। Bank Reconciliation সাধারণত প্রত্যেক মাস শেষে করা হয়। যদি একাধিক ব্যাংক থাকে তবে প্রত্যেকটি ব্যাংকের জন্য প্রত্যেক মাস শেষে আলাদা আলাদা Bank Reconciliation করতে হবে। প্রত্যেকটি Reconciliation এর জন্য দুইটি করে রিপোর্ট QuickBooks Software এ সংরক্ষিত থাকবে-একটি হচ্ছে Summary Report এবং অপরটি হচ্ছে Detail Report। যা ভবিষ্যতে যে কোনও সময় পুনরায় প্রিন্ট করা যাবে।
Bank Reconciliation করার পূর্বে কয়েকটি বিষয় অবশ্যই নিশ্চিত করতে হবে:
১. যে মাস বা যে সময়ের জন্য Reconciliation করা হবে সেই মাস বা সেই সময়ের সমস্ত Transaction QuickBooks Software এ অবশ্যই এন্ট্রি করা থাকতে হবে।
২. উক্ত মাস বা সময়ের সকল ধরণের Bank Charge এবং Bank Interest QuickBooks Software এ এন্ট্রি করা থাকতে হবে।
৩. ব্যাংক হতে উক্ত সময়ের Bank Statement সংগ্রহ করতে হবে।
এবার আমরা Bank Reconciliation করার জন্য প্রস্তুত। Bank Reconciliation করার জন্য QuickBooks Software এর Banking Menu-->Reconcile এ আসুন।
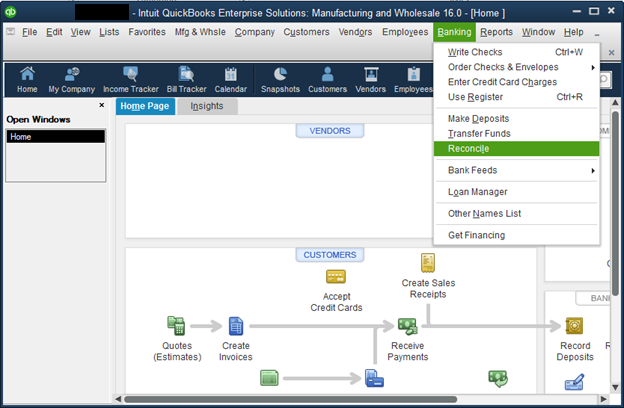
নিম্নোক্ত উইন্ডো আসবে:

নীচের গোল দাগ দেয়া ফিল্ড সমূহ সঠিকভাবে পূরণ করুন:

উপরের চিত্রের ফিল্ডসমূহ সঠিকভাবে পূরণ করুন। গোলদাগ চিহ্নিত ফিল্ড সমূহ বিশেষ সতর্কতার সাথে পূরণ করুন। নীচে গোলদাগ চিহ্নিত ফিল্ড সমূহের বর্ণনা দেয়া হলো:
Account: যে ব্যাংক একাউন্টের Bank Reconciliation করা হচ্ছে সেই ব্যাংক একাউন্টটি সিলেক্ট করুন। এখানে 702300-EBL, CA.0045111000001387 লেজারটি সিলেক্ট করা হয়েছে।
Statement Date: যে মাসের বা যে পিরিয়ডের Reconciliation করা হচ্ছে সেই মাসের বা সেই পিরিয়ডের শেষ দিনটি সিলেক্ট করুন। এখানে ডিসেম্বর মাসের Reconciliation করা হচ্ছে বিধায় ডিসেম্বর মাসের শেষ দিন অর্থাৎ ৩১-১২-২০১৫ সিলেক্ট করা হয়েছে।
Ending Balance: যে মাসের Reconciliation করা হচ্ছে সেই মাসের শেষ দিনের অর্থাৎ ৩১-১২-২০১৫ তারিখে Bank Statement অনুযায়ী ব্যাংক ব্যালেন্স লিখুন। এখানে ২১০০,০০০ টাকা লেখা হয়েছে।
অন্যান্য ফিল্ডসমূহ পূরণ করার প্রয়োজন নেই। অর্থাৎ বাকি ফিল্ড সমূহ যে অবস্থায় আছে সেই অবস্থায়ই থাকবে। এবার Continue বাটনে ক্লিক করুন। নিম্নোক্ত উইন্ডো আসবে:
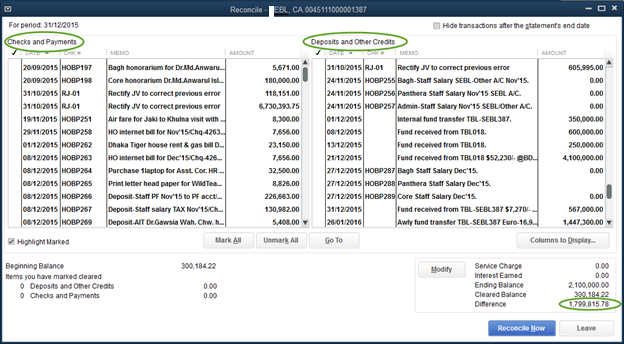
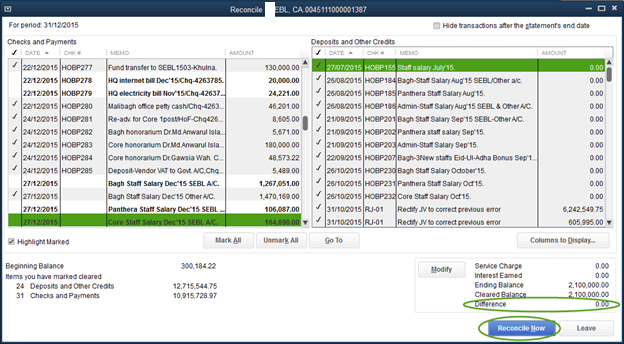
উপরোক্ত চিত্রের গোলদাগ দেয়া ফিল্ডসমূহ ব্যাখ্যা করা হলো:
Checks and Payments: এই ব্যাংক থেকে যে সমস্ত Payment করা হয়েছে এখানে সেই Payment সমূহ দেখাচ্ছে। তবে উল্লেখ থাকে যে, এখানে শুধুমাত্র Unreconciled payment সমূহ দেখাবে। Reconciled হয়ে যাওয়া Payment সমূহ আর কখনই এই লিষ্টে প্রদর্শিত হবে না।
Deposits and Other Credits: এই ব্যাংকে যে সমস্ত Deposit হয়েছে এখানে সেই Deposit সমূহ দেখাচ্ছে। তবে উল্লেখ থাকে যে, এখানে শুধুমাত্র Unreconciled Deposit সমূহ দেখাবে। Reconciled হয়ে যাওয়া Deposit সমূহ আর কখনই এই লিষ্টে প্রদর্শিত হবে না।
Differences: যেহেতু এখনও চলতি মাসের অর্থাৎ ডিসেম্বর-২০১৫ এর Reconciliation করা হয় নি তাই এখানে Difference দেখাচ্ছে।
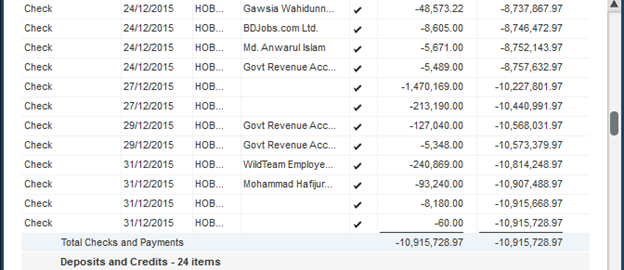
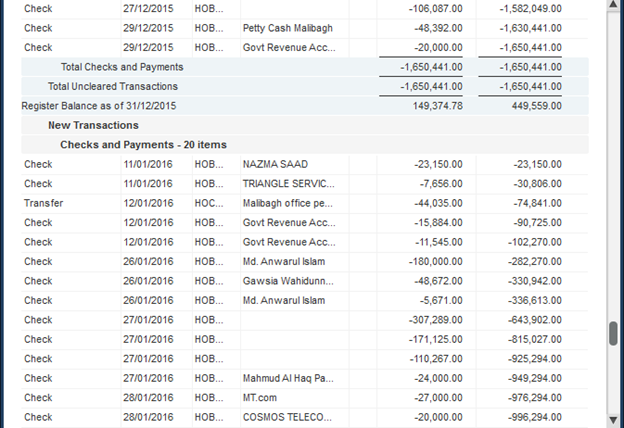
এবার Bank Statement টি হাতে নিয়ে QuickBooks Software এর Checks and Payment পার্শ্বে প্রদর্শিত যে সমস্ত Payment চলতি মাসের Bank Statement এর Payment পার্শ্বে প্রদর্শিত Payment সমূহের সাথে মিলে যাচ্ছে সেই সমস্ত Transaction গুলোকে টিক মার্ক দিয়ে সিলেক্ট করুন।
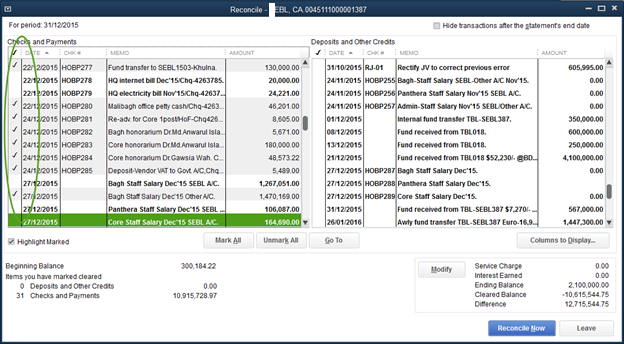
উপরের চিত্রে যে সমস্ত Transaction QuickBooks Software এ এন্ট্রি করা আছে এবং Bank Statement এর Payment পার্শ্বেও প্রদর্শিত হচ্ছে সেগুলোকে টিক চিহ্ন দিয়ে সিলেক্ট করা হয়েছে। এগুলোই Cleared Checks। আর যেগুলো QuickBooks Software এ এন্ট্রি করা আছে কিন্তু Bank Statement এর Payment পার্শ্বে পাওয়া যায় নি অর্থাৎ উক্ত চেক এখনও ব্যাংকে উপস্থাপন করা হয়নি অথবা উপস্থাপন করা হলেও কোনও কারণে ব্যাংক এখনও পরিশোথ করে নি সেই Transaction সমূহকে সিলেক্ট করা হয়নি। এগুলোই Outstanding Checks বা Un cleared Checks. এই Outstanding Check সমূহ পরবর্তী মাসের Reconciliation করার সময় এই লিষ্টে পুনবায় দেখাবে।
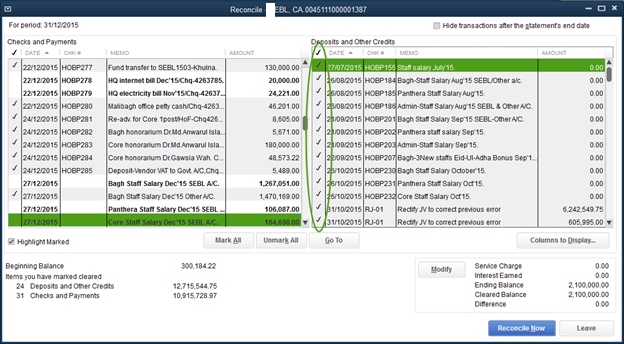
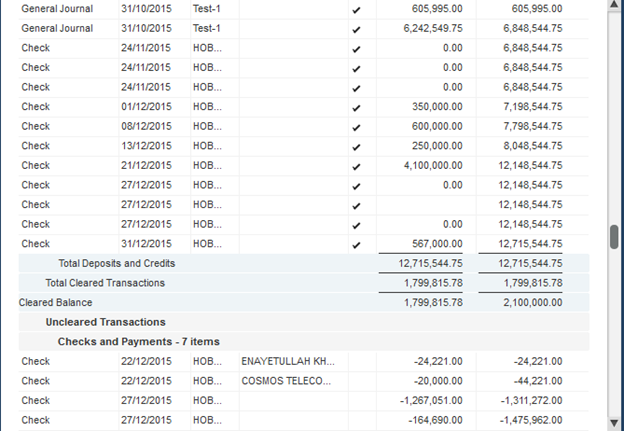
এবার নীচের চিত্রটি লক্ষ্য করুন এবং অনুরুপভাবে Deposit সমূহ সিলেক্ট করুন। অর্থাৎ যে সমস্ত Deposit QuickBooks Software এ এন্ট্রি আছে এবং Bank Statement এর Deposit পার্শ্বেও দেখাচ্ছে সেই Transaction সমূহকে টিক চিহ্ন দিয়ে সিলেক্ট করুন। এবং যে সমস্ত Deposit QuickBooks Software এ এন্ট্রি আছে কিন্তু ব্যাংকে এখনও Deposit হয় নি সে সমস্ত Transaction কে টিক চিহ্ন দেয়ার প্রয়োজন নেই। এই Deposit গুলোই Outstandng Deposit. এই Outstanding Deposit সমূহ পরবর্তী মাসের Reconciliation করার সময় এই লিষ্টে পুনবায় দেখাবে।
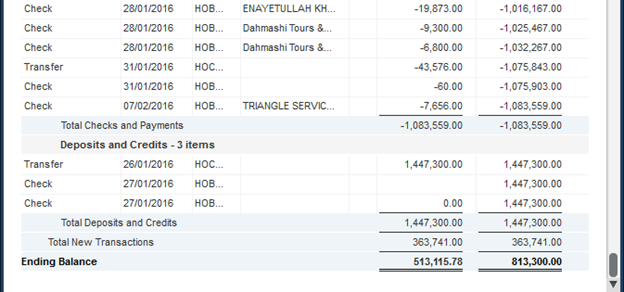
নীচের চিত্র লক্ষ্য করুন। সকল Payments এবং Deposits সিলেক্ট করার পর Difference অবশ্যই ‘0’ (zero) দেখাবে। যদি Difference ‘0’ না দেখায় তবে কোথাও কোনও ভুল হয়েছে। এই ভুল সংশোধন না করে এবং Difference ‘0’ না হওয়া পর্যন্ত ‘Reconcile Now’ বাটনে ক্লিক করা যাবে না।
যদি Difference ‘0’ না দেখায় তবে Payments এবং Deposit সমূহ পুনরায় পরীক্ষা করা উচিৎ। যেই Transaction টি পরীক্ষা করা দরকার সেই Transaction টিকে মাউস দিয়ে Double Click করুন অথবা Transaction টিকে সিলেক্ট করে “Go To” বাটনে ক্লিক করুন। তারপর প্রয়োজনীয় সংশোধন করুন অথবা Rectification Journal এর মাধ্যমে সংশোধন করে নিন।
যদি Bank Statement এর ব্যালেন্স লিখতে ভুল হয় তবে ‘Modify’ বাটনে ক্লিক করুন এবং প্রয়োজনীয় সংশোধন করে পুনরায় ‘Continue’ বাটনে ক্লিক করুন।
যদি Reconciliation করা আপতত বন্ধ রাখতে চান এবং পরে কোনও এক সময় করতে চান তবে ‘Leave’ বাটনে ক্লিক করুন। পরবর্তীতে এই পেজে আসলে পুনরায় এই অবস্থা থেকে শুরু করা যাবে।
যেহেতু Difference ‘0’ দেখাচ্ছে তাই আমরা ‘Reconcile Now’ বাটনে ক্লিক করতে পারি। ক্লিক করার পর নিম্নোক্ত উইন্ডো আসবে:
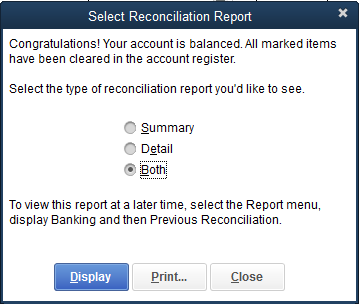
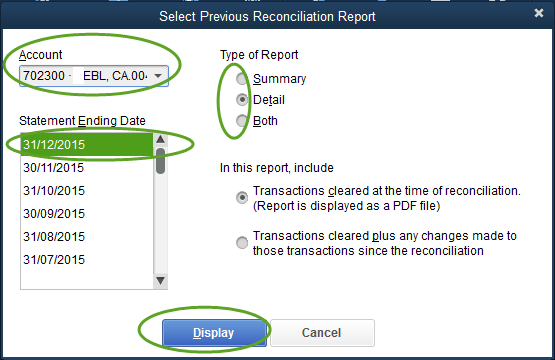
Reconciliation পর্ব শেষ। এখন আমরা চাইলে এই Reconciliation এর রিপোর্ট দেখতে পারি। Summary Report বা Detail Report যেটি দেখতে চান সেটি সিলেক্ট করে Display বাটনে ক্লিক করুন।
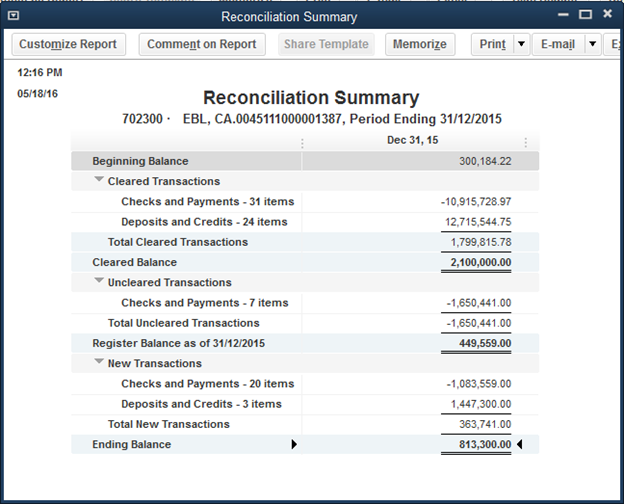
যদি দুটিই দেখতে চান তবে ‘Both’ সিলেক্ট করে ‘Display’ বাটনে ক্লিক করুন। নিম্নোক্ত রিপোর্ট সমূহ দেখাবে:
Summary Report:
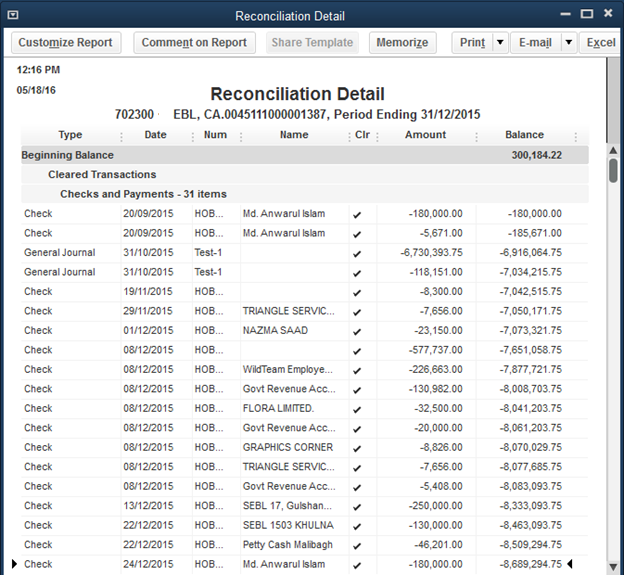
Detail Report:
ভবিষ্যতে যদি এই Reconciliation Report পুনরায় দেখার বা প্রিন্ট নেয়ার প্রয়োজন হয় তবে নিম্নোক্তভাবে তা করতে পারেন:
Report Menu-->Banking-->Previous Reconciliation এ আসুন:
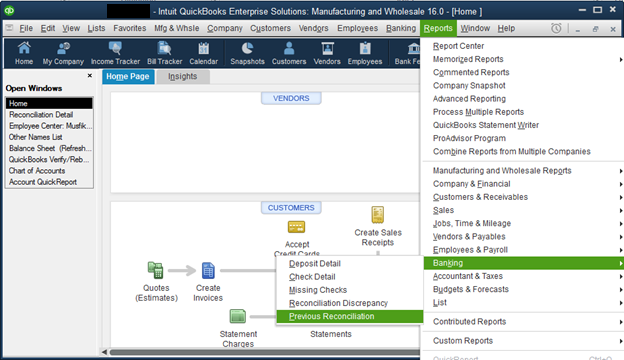
নিম্নোক্ত উইন্ডো হতে গোলদাগ দেয়া ফিল্ড সমূহ প্রয়োজন অনুযায়ী সিলেক্ট করুন এবং ‘Display’ বাটনে ক্লিক করুন। কাঙ্খিত রিপোর্টটি প্রদর্শিত হবে।
এখানে বিশেষভাবে উল্লেখ করা হচ্ছে যে, “Reconcile Now” বাটনে একবার ক্লিক করলে এটা Undo বা Revert করা যাবে না। Difference ‘0’ না হয়ে অন্য কোনও ফিগার থাকা অবস্থায় যদি ‘Reconcile Now’ বাটনে ক্লিক করা হয় তবে Difference Figure টি দিয়ে QuickBooks সয়ংক্রিয়ভাবে একটি Journal Entry করে নিবে। এই Journal Entry নিম্নের যে কোনও একটি হতে পারে:
Reconciliation Discrepancy Debit
Opening Balance Equity Credit
অথবা
Opening Balance Equity Debit
Reconciliation Discrepancy Credit
এই Reconciliation Discrepancy লেজারের ব্যালেন্স Profit & Loss Account এ দেখাবে। এটা ভবিষ্যতে Internal বা External Audit করার সময় খুব সহজেই দৃষ্টিগোচর হবে-যা প্রতিষ্ঠানের জন্য অত্যন্ত ক্ষতিকর একটি দিক।
কোনও নির্দিষ্ট সময় পর অর্থাৎ নির্দিষ্ট মাস, কোয়ার্টার বা বছর পর QuickBooks Software এর ডাটা লক করার প্রয়োজন হতে পারে। অর্থাৎ, কোনও মাস বা বছর শেষে রিপোর্ট ফাইনাল করার পর উক্ত ডাটা Edit বা Delete করা হতে ইউজারদেরকে বিরত রাখার প্রয়োজন হয় – যা Set Closing Date অপশনের মাধ্যমে করা যায়। এই অপশনটি ব্যবহারের ফলে সেটকৃত তারিখ বা এর পূর্বের কোনও তারিখের কোনও এন্ট্রি ইউজাররা Edit বা Delete করতে পারবে না এবং নতুন কোনও এন্ট্রিও Add করতে পারবে না।
Closing Date সেট করার জন্য Edit Menu-->Preference এ আসুন:
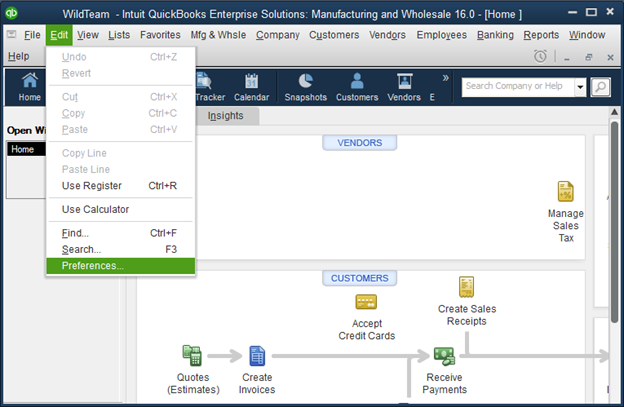
নিম্নোক্ত উইন্ডো আসবে:
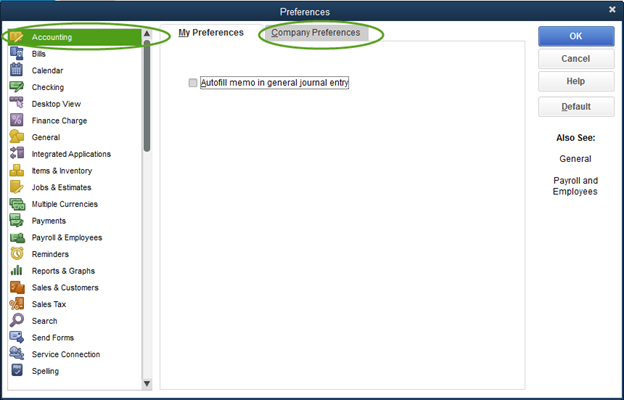
উপরোক্ত উইনডোতে Accounting এবং Company Preference এ অর্থাৎ গোলদাগ দেয়া অপশনসমূহে ক্লিক করুন। এরপর নিম্নোক্ত উইন্ডো আসবে:
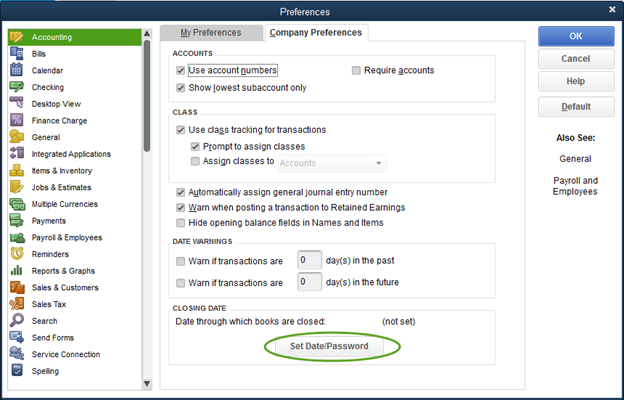
Set Date/Password লেখা গোলদাগ দেয়া অংশে ক্লিক করুন। নিম্নোক্ত উইন্ডো আসবে:
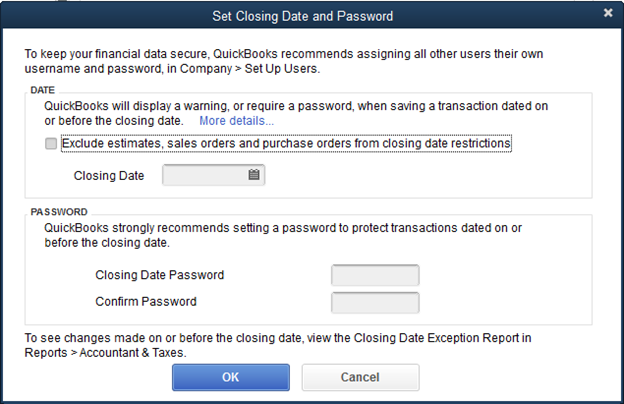
এবার গোলদাগ দেয়া ফিল্ড সমূহ প্রয়োজনী তথ্য দিয়ে পুরণ করুন অর্থাৎ একটি Closing Date দিন যে তারিখের পূর্বের ডাটা লক করা হবে এবং Password অংশে Password বসান। এবং “OK” বাটনে ক্লিক করুন।
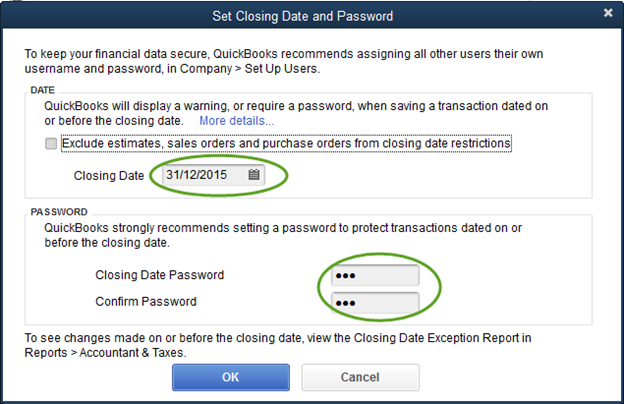
উক্ত সেটকৃত তারিখের পূর্বের কোনও এন্ট্রি Edit বা Delete করতে চাইলে QuickBooks এই Password চাইবে। যদি ইউজার সঠিক পাসওয়ার্ড বসাতে পারেন তবেই Edit বা Delete করতে পারবে, অন্যথায় নয়।
এখানে উল্লেখ থাকে যে, শুধুমাত্র Admin User Closing Date Set করতে পারবে। সেটকৃত এই Closing Date পরবর্তীতে যে কোনও সময় Edit বা Delete করা যাবে। Edit বা Delete করার জন্য একই পদ্ধতি অনুসরণ করতে হবে।
Customer এর বকেয়া ব্যালেন্স Collect করা এবং প্রতিষ্ঠানের Credit Control System ঠিক রাখার জন্য কাষ্টমারদেরকে যার যার বর্তমান ব্যালেন্সসহ একটি Statement বা বিবরণী পাঠানো যেতে পারে। এই বিবরণী অনেকটা ব্যাংক Statement এর অনুরুপ। এখানে একটি নির্দিষ্ট মেয়াদের মধ্যে একজন Customer এর বিক্রয়, ফেরত, পেমেন্ট, সমন্বয়ের তথ্য সহ তার বর্তমান ব্যালেন্স এবং এই ব্যালেন্সের Aging উল্লেখ থাকে।
Customer Statement তৈরী করার জন্য Customer Menu-->Create Statement এ আসুন।
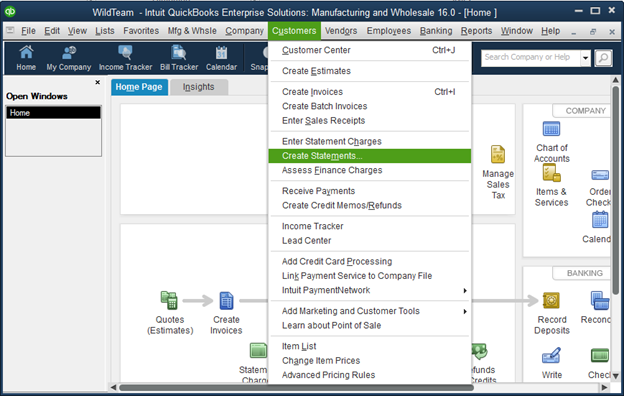
নিম্নোক্ত উইন্ড আসবে:
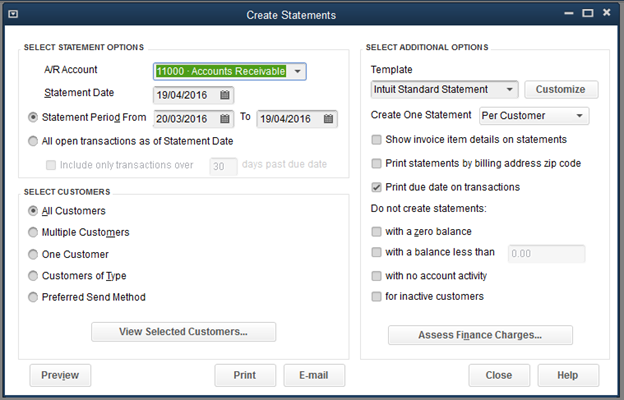
নিম্নোক্ত উইন্ডো হতে বৃত্তাকার ফিল্ড সমূহ সিলেক্ট করুন:
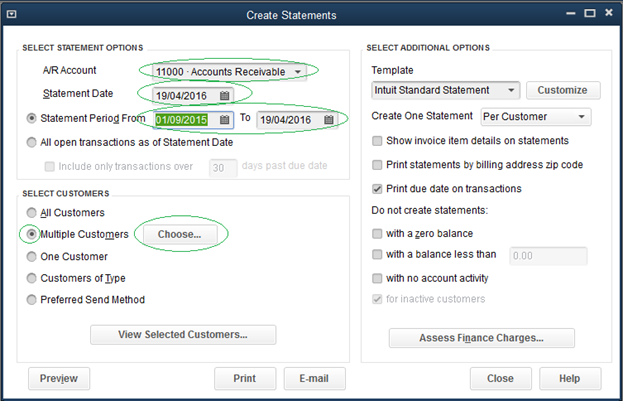
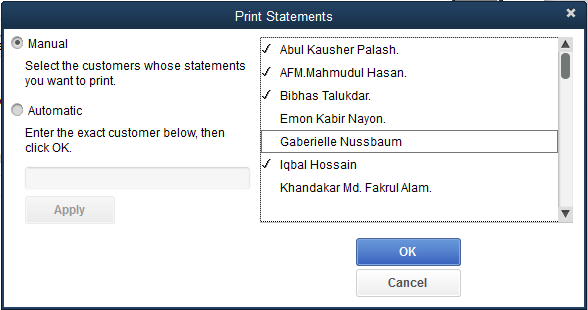
Multiple Customer বরাবর “Choose” এ ক্লিক করার পর নিম্নোক্ত উইন্ড আসবে। যে Customer দের কাছে Statement পাঠানো হবে সেই Customer দের নামের বাম পার্শ্বে টিক চিহ্ন দিয়ে সিলেক্ট করুন এবং OK বাটনে ক্লিক করুন।
পুণরায় নিচের উইন্ডোতে ফেরত আসবে। এখানেও প্রয়োজন অনুযায়ী গোল দাগ দেয়া ফিল্ড সমূহ সিলেক্ট করুন।
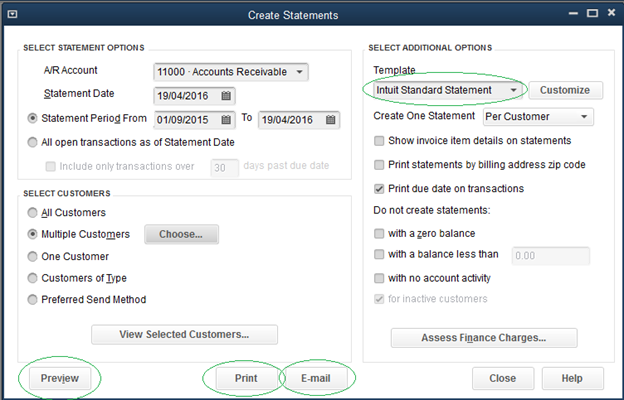
Template ফিল্ড হতে প্রয়োজনীয় Template সিলেক্ট করুন। এখানে Drop-Down লিষ্টে একাধিক Template থাকতে পারে। প্রতিষ্ঠানের প্রয়োজন অনুযায়ী এই Template সমূহ Customize বা Re-design করে নেওয়া যায়।
Statement এর প্রিভিউ দেখতে চাইলে Preview বাটনে ক্লিক করুন। প্রত্যেকের Statement আলাদা আলাদাভাবে প্রিভিউ দেখাবে।
Statement সমূহ প্রিন্ট করেত চাইলে Print বাটনে ক্লিক করুন। প্রত্যেকের Statement আলাদা আলাদাভাবে প্রিন্ট হবে।
Statement সমূহ ইমেইল করতে চাইলে Email বাটনে ক্লিক করুন। প্রত্যেকের Statement আলাদা আলাদাভাবে যার যার ইমেইল এড্রেসে চলে যাবে। এক্ষেত্রে সেন্ডারের কম্পিউটারে Microsoft Outlook সেটাপ করা থাকতে হবে অথবা Gmail, Yahoo, Hotmail ইত্যাদির কোনও একটি QuickBooks এর Preference অপশন এর Send Forms কনফিগার করা থাকতে হবে।
এই ইমেইল সমূহের Recipient দের অর্থাৎ Customer দের নাম সমূহ Create করার সময় অবশ্যই ইমেইল এড্রেস ফিল্ড এ যার যার ইমেইল এড্রেস বসাতে হবে।
বর্তমান মিশ্বে বহুল আলোচিত একটি মতবাদ হচ্ছে “Paperless Office”. এটির মূল লক্ষ্য হলো বিভিন্ন Transaction এর Supporting Paper সমূহ Hard Copy বা Printed Copy আকারে সংরক্ষণ না করে এটির Soft Copy বা Scanned copy আকারে সংরক্ষণ করা। এতে কাগজের ব্যবহার বহুলাংশে কমবে যা অত্যন্ত পরিবেশ সহায়ক- ফলে আমরা এগিয়ে যেতে পারবো Green Accounting Concept এর দিকে।
Paperless Office Concept অনুযায়ী প্রতিটি Transaction এর Supporting Paper সমূহ সেই Transaction এর ভাউচারের সাথে Hard copy আকারে সংযুক্ত না করে এই Transaction টি এন্ট্রি করার সময় Accounting Software এর মধ্যেই Transaction টিকে Save করার পূর্বেই উক্ত Supporting Paper টিকে সংযুক্ত করা। বর্তমার বিশ্বে মাত্র দুই একটি Accounting Software এ এই সুবিধা পাওয়া যায়-তাদের মধ্যে QuickBooks অন্যতম।
QuickBooks Accounting Software এর প্রত্যেকটি Transaction Form যেমন: Write Checks, Journal Entry, Transfer Funds, Estimates, Sales Order, Invoice, Receive Payments, Purchase Order, Enter Bills etc. এ এই ফিচারটি রয়েছে। আমরা একটি উদাহরণের মাধ্যমে বিষয়টি আলোচনা করতে পারি।
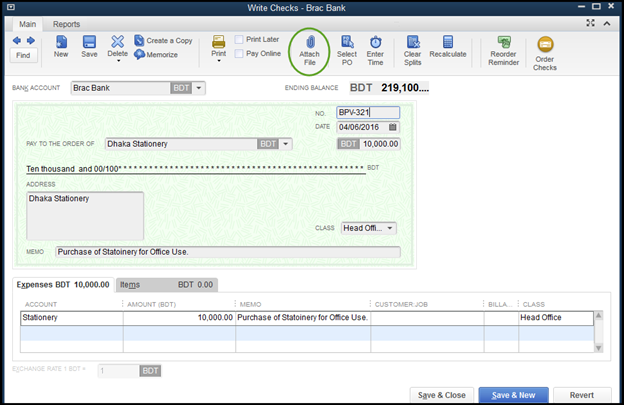
উদারহণ: অফিসে ব্যবহারের জন্য ১০,০০০ টাকার Stationery কেনা হলো এবং তা চেকের মাধ্যমে পরিশোধ করা হলো।
এটি একটি Payment Voucher যা QuickBooks এর Write Checks অপশনের মাধ্যমে এন্ট্রি করতে হবে। এই Transaction এর Supporting Paper হতে পারে Purchase Requisition, Invoice/Cash Memo, Cheque এর Scanned Copy, Money Receipt etc. তবে এত Document অনেকে সংরক্ষণ না করলেও অন্তত Cash Memo, Cheque এর Scanned Copy এবং Money Receipt সাধারণত সংরক্ষন করা হয়।
এবার আসা যাক উপরোক্ত Transaction টিকে আমরা QuickBooks এ কিভাবে এন্ট্রি করবো এবং এন্ট্রি করার সময় কিভাবে Supporting Document গুলো সংযুক্ত করবো।
Banking Menu-->Write Checks এ আসুন:
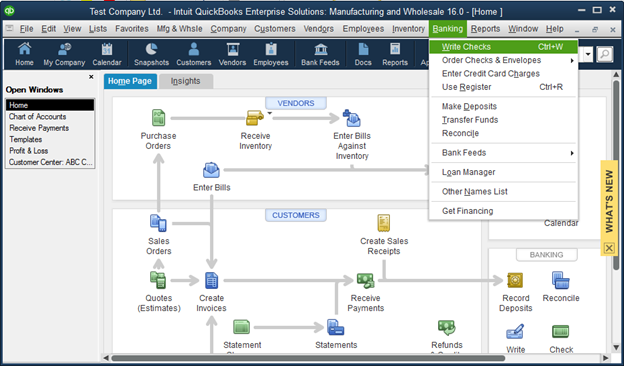
নিম্নক্তো উইন্ডো আসবে:
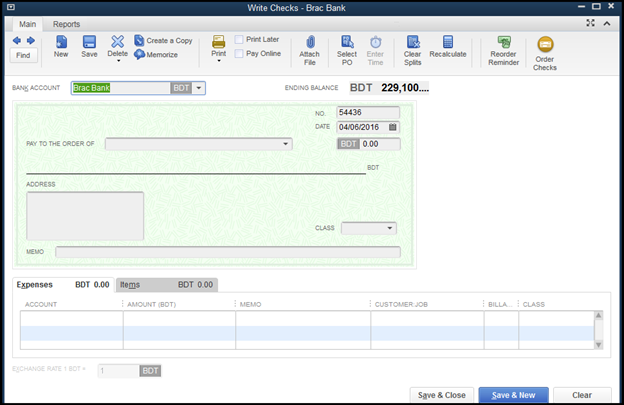
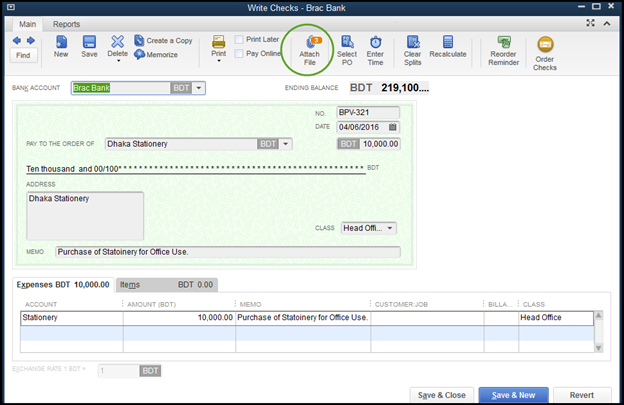
নিম্নক্ত ফিল্ড সমূহ সঠিকভাবে পূরন করুন এবং গোল দাগ দেয়া ফিল্ডে ক্লিক করুন:
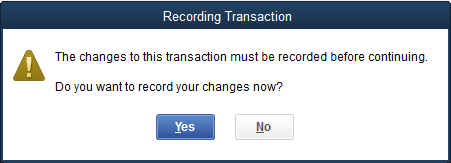
নিম্নোক্ত উইন্ডো আসবে। Documents Attach করার পূর্বে Save করতে হয়। তাই “Yes” বাটনে ক্লিক করুন:
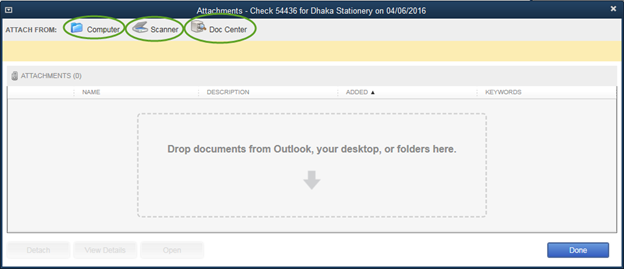
নিম্নোক্ত উইন্ডো আসবে। গোলদাগ দেয়া ৩টি অপশনের যে কোনও একটিতে ক্লিক করুন। নীচে ৩টি ফিল্ডের সংক্ষিপ্ত বর্ণনা দেয়া হলো:
Computer: Supporting Paper টি যদি কম্পিউটারে থেকে থাকে তবে “Computer” বাটনে ক্লিক করে Brows করে চিনিয়ে দিন।
Scanner: Supporting paper টি যদি Scan করার জন্য Scanner এ দেয়া থাকে তবে সরাসরি সেখান থেকে ডকুমেন্টটিকে এটাচ করা যায়। এক্ষেত্রে “Scanner” অপশনে ক্লিক করুন।
Doc Center: Document টি পূর্বেই যদি Software সংরক্ষণ করা থাকে তবে Doc Center গিয়ে এই Transaction এর সাথে সম্পর্কিত ফাইলটি বা ফাইলগুলো চিনিয়ে দিতে হবে।
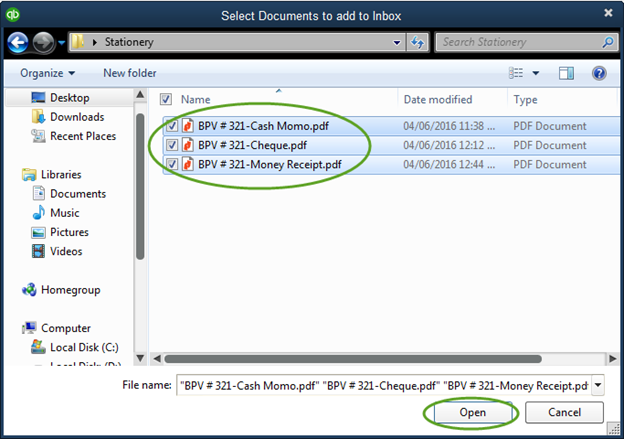
তবে প্রথম অপশনটিই বেশী ব্যবহৃত হয় অর্থাৎ Computer এ সংরক্ষিত ফাইলটি এটাচ করা। তাই Computer অপশনে ক্লিক করুন এবং Brows করে প্রয়োজনীয় Supporting Papers এর Scanned File গুলো চিনিয়ে দিন:
নিম্নোক্ত ফাইলগুলো চিনিয়ো দিন। একটি বিষয় লক্ষণীয় -ফাইলগুলো স্কান করে সেভ করার সময় প্রতিটি ফাইলের নামের আগে ভাউচার নম্বর লিখে রাখূন (যেমন: উপরের উদাহরণে BPV-321)। এতে ভবিষ্যতে ফাইল ম্যানেজমেন্ট এ সুবিধা হবে।
এরপর নিম্নোক্ত উইন্ডো আসবে। ৩টি ফাইল এটাচ হয়েছে। এবার “Done” এ ক্লিক করুন।
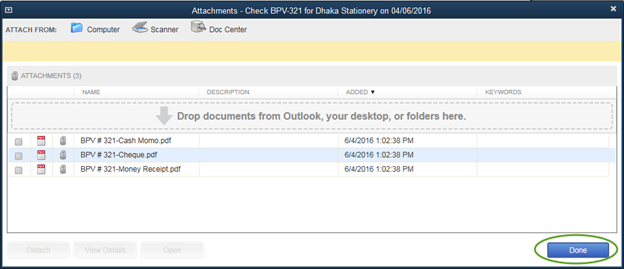
নীচের উইন্ডোর গোলদাগ দেয়া ফিল্ড এ লক্ষ্য করুন- ৩টি Document Attached হয়েছে। এবার “Save & Close” অথবা “Save & New” বাটনে ক্লিক করে Transaction টি সেভ করুন।
ভবিষ্যতে এই Transaction টি Open করে Attached File সমূহ পুনরায় দেখা যাবে। প্রয়োজনে নতুন ফাইল Add বা পুরাতন ফাইল Delete করা যাবে। Internal এবং External Auditor গন একই ভাবে Transaction এবং এটাচড ফাইল Open করে নিরীক্ষার কাজ করতে পারবেন।
এটাচ ফাইল আকারে যে কোনও ধরনের ফাইল সংযুক্ত করা যায়। যেমন: Doc, Docs, Xls, Xlsx, PDF, Text, Image ইত্যাদি।
QuickBooks Accounting Software এর বিভিন্ন Edition এ বিভিন্ন পরিমান রিপোর্ট সংযোজিত আছে। যেমন: QuickBooks Pro Edition এ ১৫০ টিরও বেশী, QuickBooks Premier Edition এ ২০০ টিরও বেশী এবং QuickBooks Enterprise Solutions এ ৩০০ টিরও বেশী। Edition যাই হোক না কেন এই রিপোর্ট সমূহ দেখতে হলে Reports Menu হতে তা দেখতে হয়। নীচে প্রধান প্রধান রিপোর্ট সমূহ কিভাবে দেখতে হয় তা দেখানো হলো:
| Sl No | Report Name | Location in QuickBooks |
| 1 | Profit & Loss A/C | Reports Menu->Company & Financials->Profit & Loss Standard |
| 2 | Profit & Loss by Class | Reports Menu->Company & Financials->Profit & Loss by Class |
| 3 | Balance Sheet | Reports Menu->Company & Financials->Balance Sheet Standard |
| 4 | Trial Balance | Reports Menu->Accountant & Taxes-> Trial Balance |
| 5 | General Ledger | Reports Menu->Accountant & Taxes-> General Ledger |
| 6 | Statement of Cash Flows | Reports Menu->Company & Financials->Statement of Cash Flow |
| 7 | Transaction List by Date | Reports Menu->Accountant & Taxes->Transaction List by Date |
| 8 | Transaction List by Account | Reports Menu->Accountant & Taxes->Transaction List by Account |
| 9 | All Transactions Journal List | Reports Menu->Accountant & Taxes->Journal |
| 10 | Audit Trail | Reports Menu->Accountant & Taxes-> Audit Trail |
| 11 | Inventory Valuation Summary | Reports Menu->Inventory->Inventory Valuation Summary |
| 12 | Inventory Valuation Detail | Reports Menu->Inventory-> Valuation Detail |
| 13 | Stock Status by Items | Reports Menu->Inventory->Stock Status by Items |
| 14 | Customer Balance Summary | Reports Menu->Customers & Receivables->Customer Balance Summary |
| 15 | Customer Balance Detail | Reports Menu->Customers & Receivables->Customer Balance Detail |
| 16 | Customer Aging Summary | Reports Menu->Customers & Receivables->Customer Aging Summary |
| 17 | Customer Aging Detail | Reports Menu->Customers & Receivables->Customer Aging Detail |
| 18 | Vendor Balance Summary | Reports Menu->Vendors &Payables->Vendor Balance Summary |
| 19 | Vendor Balance Detail | Reports Menu->Vendors &Payables->Vendor Balance Detail |
| 20 | Vendor Aging Summary | Reports Menu->Vendors &Payables->Vendor Aging Summary |
| 21 | Vendor Aging Detail | Reports Menu->Vendors &Payables->Vendor Aging Detail |
| 22 | Company Snapshot (For Graphical Report) | Reports Menu->Company Snapshot |
Editing QuickBooks Transactions and Lists
| Ctrl-Del | Delete the selected line in a transaction |
| Ctrl-Ins | Insert a blank detail line in a transaction |
| Ctrl-N | Create a new transaction or list item |
| Ctrl-D | Delete the current transaction or list item. Please note that you cannot reverse this once done, usually |
| Ctrl-E | Edit an item in an item list, or in a register |
| Ctrl-O | If you are looking at a check in the write checks window, or in the check register, use ctrl-O to copy the check. You can then use ctrl-V to create (paste) a copy of that check if you are in the check register |
| F5 | Refresh List. You only see this if you are in multi-user mode, when you have a “list” open. This will force QuickBooks to go back to the database server and retrieve the latest copy of the list. If multiple users are editing the list this may be useful. Note that all lists that are open at the time should be refreshed. |
Opening QuickBooks Windows and Lists
| Ctrl-W | Opens the write check window to write a new check |
| Ctrl-Q | Open a Quick Report for a list item when you have selected the item in the list |
| Ctrl-Y | Open a transaction journal for a transaction, if you are viewing the transaction |
| Ctrl-J | Open the customer center |
| Ctrl-A | Open the Chart of Accounts |
| Ctrl-I | Open the create invoice window to create a new invoice |
| Ctrl-L | Open a list – if the cursor is in a field that has a dropdown list, such as selecting the item in an invoice detail line, this will open the list associated with that dropdown |
| Ctrl-U | Use the list item if you have just used ctrl-L to open the list from a transaction. This is a very useful feature that many people aren’t familiar with. |
| Ctrl-R | Most transactions have a register associated with them. This opens the register for the transaction you are looking at |
| Ctrl-G | This is an odd one I’m still figuring out. If you are in a register for an account, entering ctrl-G will take you to the register for the “transfer” account associated with the line you have selected |
| Ctrl-F | Opens the find window for the list or transaction type you are working with. This is the old-style Find, not the new Search feature (F3) |
| F1 | Opens the Help window |
| F2 | Displays the Product Information window, which has a large amount of information that can be very helpful when diagnosing problems in QuickBooks (Ctrl-1 is an alternate) |
| F3 | Starting with the 2011 version, this opens the newer Search feature (as opposed to the Find feature) |
| F3 | If you have the Product Information window open (by pressing F2), pressing F3 here will open the tech help window. This provides a wide range of system and diagnostic information, as well as being a quick way to view (and possibly edit, if you are careful) a number of support and technical files that relate to QuickBooks operations (Ctrl-2 is an alternate) |
| F4 | This opens the QuickBooks Technical Support Helper window |
| Ctrl-1 | This does the same as F2, opening the Product Information window |
| Esc | Close the current window |
| Ctrl-F4 | Close the current window (same as Esc) |
| Ctrl-F6 | Move to the next open window and make it active. NOTE that for some reason SOME windows don’t allow this, such as the Accountant Center (thank you Mary Longacre for pointing that out) |
| Ctrl-Tab | Same as Ctrl-F6, moves to the next open window |
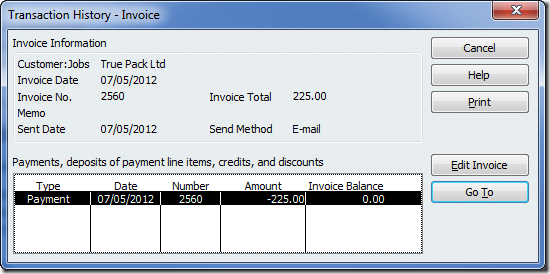
| Ctrl-H | Open the Transaction history – if you have a transaction like an invoice, which has payments applied to it, the transaction history can be very useful |
Maneuvering
| + | (plus key) Increase a number in a form, such as a check number or invoice number |
| – | (minus key) Decrease a number in a form, such as a check number or invoice number |
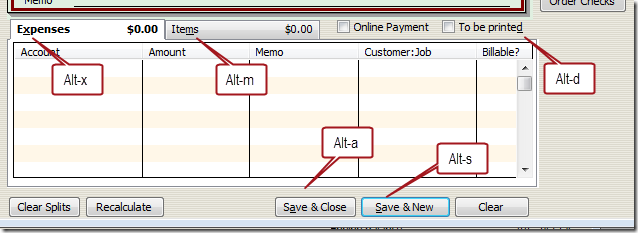
| Alt-S | Save the current transaction |
| Alt-N | Save the current transaction and go to the next |
| Alt-P | Go to the previous transaction |
| Tab | Go to the next field |
| Shift-Tab | Go to the prior field |
| Up Arrow | Go to the previous line in a form |
| Down Arrow | Go to the next line in a form |
| Page Up | Move to a previous page in a form area or report |
| Page Down | Move to the next page in a form area or report |
| Ctrl-Page Up | Move to the first item in a list or register |
| Ctrl-Page Down | Move to the last item in a list or register |
| Enter | If you are viewing a report this will “quick zoom” – open a register or detailed report. In other windows this will often select the highlighted button/operation |
| Ctrl-Enter | Record (save) the current record. If you have several buttons at the bottom of a transaction window (like “Save & Close”, “Save & New”, “Clear” and so forth) then Ctrl-Enter will select the best “save” option available. Enter will select the button that is highlighted, which might not be the best “save” option |
If you have selected a menu and you see a letter underlined in one of the menu options, OR if you are in a window and you see a letter underlined in one of the buttons, hold the Alt key down and press that letter to invoke that option.
Opening/Closing QuickBooks
When you open QuickBooks the program will usually try to open the last company you worked with, and possibly open all of the windows that you had open when you last exited (this can be controlled by your desktop preferences). Sometimes, when you are having problems with a QuickBooks company file, you want to change how it starts. If you hold down one of these keys when you click on your QuickBooks shortcut, it changes how QuickBooks starts.
| Ctrl | Start QuickBooks without opening a file. This is useful if you are having problems with the last company file you were using – and you want to start with the Open or Restore Company window |
| Alt | Start QuickBooks without all the windows. If you have your desktop set to remember what windows you have open, sometimes it takes a VERY long time to start QuickBooks. This option will start it without opening all the windows |
| Alt-F4 | Close QuickBooks |
QuickBooks Date Shortcuts
When the cursor is on a date field you can do more than just type in a date or select the date by calendar – you can select some of the special date values with just a few keys.
| + | (plus key) Advance to the next day |
| – | (minus key) Previous day |
| T | Today |
| W | First day of the Week |
| K | Last day of the weeK |
| M | First day of the Month |
| H | Last day of the montH |
| Y | First day of the Year |
| R | Last day of the yearR |
| [ | (left bracket) Same day in previous week |
| ] | (right bracket) Same day in next week |
| ; | Same date last month |
| ‘ | (apostrophe) Same date next month |
| Alt-down arrow | Opens the calendar for date selection (the small date calendar, not the “Calendar” feature) |
Memorized Transactions
You can memorize common transactions so that you can easily reproduce them later. Think of this as creating a template that you can make copies from.
| Ctrl-M | Memorize the current transaction. This opens the memorize transaction window |
| Ctrl-T | Create a new transaction from a memorized transaction. This opens the memorized transaction list |
Miscellaneous Shortcuts
| Ctrl-P | |
| Ctrl-R-P | If you have been trying to register QuickBooks, and you have been given a “validation code”, you can easily get to the registration window where it asks you for this code without having to go through all the normal steps for registration. Open QuickBooks, select Help and then About QuickBooks. When the product splash screen shows, press Ctrl-R-P (hold the Ctrl key down then press R and P in succession). This opens the window that lets you enter your validation code |
Standard Text Editing
These are the standard text editing keys we all know and love (at least, you should all know these by now) for most Windows programs. I’ll repeat them here for completeness. These work while you are in a data field – note that some of these keys have a different (but similar) effect if you are not clicked on a data field, but have selected a transaction window.
| Ctrl-Z | Undo typing or changes made in field |
| Ctrl-X | Cut (copy the selected text to the clipboard and remove it from the field). |
| Ctrl-C | Copy the selected text to the clipboard |
| Ctrl-V | Paste text from the clipboard to the field |
| Del | Delete a character to the right |
| Backspace | Delete a character to the left |
| Home | Go to the first character in the field |
| End | Go to the last character in the field |
| Ctrl-Right Arrow | Move to the next word in a current text field |
| Ctrl-Left Arrow | Move to the previous word in a current text field |
এই টিউনের বিষয়গুলো আরও বিস্তারিত জানতে নিম্নোক্ত ভিডিও টিউটোরিয়ালগুলোর সাহায্য নিতে পারেন:
প্রাকটিস করতে গিয়ে কোনও রকম সমস্যা হলে এই টিউনের Comment সেকশনে টিউমেন্ট করে জানাতে পারেন অথবা ফেসবুক গ্রুপে জয়েন করে সমস্যাটি টিউন করতে পারেন। আশাকরি সহযোগীতা করতে পারবো। সমস্যায় পড়লে সংশ্লিষ্ট টিউনেই সমস্যাটি জানান। অর্থাৎ ১০ম টিউনের সমস্যা ১০ম টিউনেই জানান। অন্য টিউনে না জানানোই ভালো হবে। এতে ভবিষ্যতের পাঠকেরা নির্দিষ্ট টিউন সংক্রান্ত সমস্যার সমাধান সেই টিউনেই পাবে।
ধন্যবাদ সবাইকে।
আমি মোহাম্মদ হাফিজুর রহমান। বিশ্বের সর্ববৃহৎ বিজ্ঞান ও প্রযুক্তির সৌশল নেটওয়ার্ক - টেকটিউনস এ আমি 11 বছর 2 মাস যাবৎ যুক্ত আছি। টেকটিউনস আমি এ পর্যন্ত 12 টি টিউন ও 103 টি টিউমেন্ট করেছি। টেকটিউনসে আমার 5 ফলোয়ার আছে এবং আমি টেকটিউনসে 0 টিউনারকে ফলো করি।


![QuickBooks Accounting Software চেইন টিউটোরিয়াল [৪র্থ-পর্ব] :: Chart of Accounts তৈরী করা (শেষাংশ)](https://dnc.techtunes.io/tDrive/tuner/hafij2005/253810/QuickBooks-75x75.jpg "QuickBooks Accounting Software চেইন টিউটোরিয়াল [৪র্থ-পর্ব] :: Chart of Accounts তৈরী করা (শেষাংশ)")
![QuickBooks Accounting Software চেইন টিউটোরিয়াল [৯ম-পর্ব] :: Setup Users, Find Transactions, Data Export-Import, Data Verify and Rebuild](https://dnc.techtunes.io/tDrive/tuner/hafij2005/296479/qb.png "QuickBooks Accounting Software চেইন টিউটোরিয়াল [৯ম-পর্ব] :: Setup Users, Find Transactions, Data Export-Import, Data Verify and Rebuild")
quick book software setup + training total nite chai? 01914886384